Welcome to my Sharps 'n' Dulls, the place for me to share my witty and not so witty humour, about my life around the university of eastern funland, games and comics as well as my projects in cosplay and props.

Wednesday, February 22, 2012

Replacing the save-battery on my Gameboy Color Pokémon Gold parts 1/2 & 2/2


Part 1/2: During the Christmas-holiday I suddenly had a huge graving to play my old Pokémon
-games, mainly the Gold-version, even though I also own Blue and my little brother owns Red and Crystal which only I tend to play these days... That is I would've played them but my little brothers had lost the games>.< No Pokémon for me for Christmas... A month later they finally managed to bother looking for the games and found my Gold and the Red/Crystal versions with the second Gameboy Color. They also eventually found my Link Cable, but the poor Blue is still missing>.< I now regret borrowing the games to the second brother, but I'm making sure to haunt him about finding it^^

But the problems weren't over, as I was unable to load a saved game. After a little bit of Googling I found out that the save battery must be dead, and after 12 years of keeping the time (Note: Red&Crystal save and load fine, just goes to show how much more I used to play my Pokémon-games^^' In fact, the Crystal has kept it's date and time almost accurately, with just 10 minutes of error over the years, possibly because of something like this, but most likely due to the battery's life wearing down) and saved progress, I can't blame it. You did well, little battery^^ I easily found a video-tutorial on the subject and used that to see what kind of a battery replacement-operation I would be facing.

IMPORTANT: Always make sure you know what you're about to do, take extra care to read/watch through possible tutorials and always remember to ground yourself so that any static electricity you form while moving/sitting/living will not discharge into the fragile components and possibly break your precious games. This applies to all open/exposed printed circuit boards.


Then I had to find the replacement, but the official batteries were sold out in the video's shop so yesterday I went and bought a two-pack of CR2025 batteries for 4ish €, CR2032-type works just as well, but I used the 2,5 mm thick one because that's what the old battery inside my Gold was. CR2025-name has the following info: the battery-material type, the next is the diameter of 20 mm and the 25 stands for the thickness of 2,5 mm.


Next was the dismantling-part, but before that I had to find something or make a screwdriver to open that weird screw. I tried the long-nose-pliers-trick as shown on the video but it didn't work all that good for me, as I thought I needed something which I could have around for the sole purpose of Gameboy-games.


...And with a little help from my dad in supplying the broken screwdriver I could demolish and file into something that's quite dangerous-looking^^'


It fits quite nicely^^ I left the gap between the teeth just a little bit small so it still requires a steady hand but I figured I might need some room for future modifications... I know, that probably made no sense to anyone but me but whatever, onto the next phase!


After the screw came off I was amused at the slide-to-open feature of the case^^' I might've been a little bit tired at the time. But it showed me that the printed circuit board didn't move with the face-half of the case, meaning that it was made so that the front was supposed to be removed.


And I was right, had I tried to remove it the other way around I would've risked accidentally dropping the circuit board.


The face-case has nothing to keep the circuit board in place, so keep that in mind if you plan a similar dismantling of your Gameboy-game. I moved the circuit board a little for the picture and turned it around in my hand to see what it looked like after the picture. I advice you not to touch the circuit board as much as possible, the less contact you make, the better you are. Keeping your hands clean is a given, and if you have to touch the board, the safest approach is treating it like a dvd-disc, touching it only on the edges. The battery itself is safe to touch, but pretty much everything else is a no-go-zone, you'll thank me later^^


A close-up on the entire thing, if you click the picture for a zoomed view you might be able to make it out that it says 00-12 on the battery itself, I'm pretty sure that's the battery's "life expectancy"-date, oh Nintendo, how thoughtful^^ And it's funny that I bought Gold in 2001 when it was released here in Europe and ended up returning with battery-surgery in 2012... How in the world are my brother's Red/Crystal still fine?o.O There's the recommended battery-model written on the printed circuit board right above the battery as well, CR2025 which is handy to know, and you should check what it says in your game before buying batteries.


After carefully melting the solder with my roommate's figure-burning-tool (which is basically just a soldering iron with multiple fancy tips) I managed to remove the old battery. You almost need three hands for this, one to hold down the circuit, one to melt the solder and one to simultaneously carefully pull the battery off the solder. I managed to do it with my two hands so it's plausible but difficult, just try not to burn yourself, ok?


The braces were really difficult to remove cleanly as they were spot welded but with a sharp edge and a little bit of unrefined force applied they came off^^' This would be unnecessary if you'd have an official part, but I was kinda anxious to start playing so I couldn't bother to look/wait for the parts. I also cut the yellow shaped-insulator-tape so I could reuse it^^


The new Energizer-battery has diapers - that was my first reaction to this... My mental stability is back to normalish now from yesterday, thank you for caring^^ I applied some non-water-solube glue so the insulations stays in place. It's there to stop the battery from short-circuiting if something like dust gets inside the game. Almost all glues works, as they don't carry a current from the minus to the plus-side of the battery when they dry up.


I tried soldering the braces onto the new battery but I didn't have enough solder, just the amount that was in the battery connections. I also noticed that even though I tried dropping a molden solder drop onto the battery and the brace so I wouldn't actually touch the battery with the soldering iron, the battery still ended up too hot to touch, the brace must've conducted the heat into the battery. I was worried the extra heat might break the battery so I replaced it with the second battery I had bought and just did some fancy taping^^' I recommend using electrical tape as it's more likely to last longer, and that'll save you from whole this trouble a while longer^^


After soldering everything together again it looks a little sketchy but it's the purpose, not the means, right? It was really good to have the picture from earlier which showed which way it was supposed to go, I would've done it wrong if I hadn't double checked it^^'


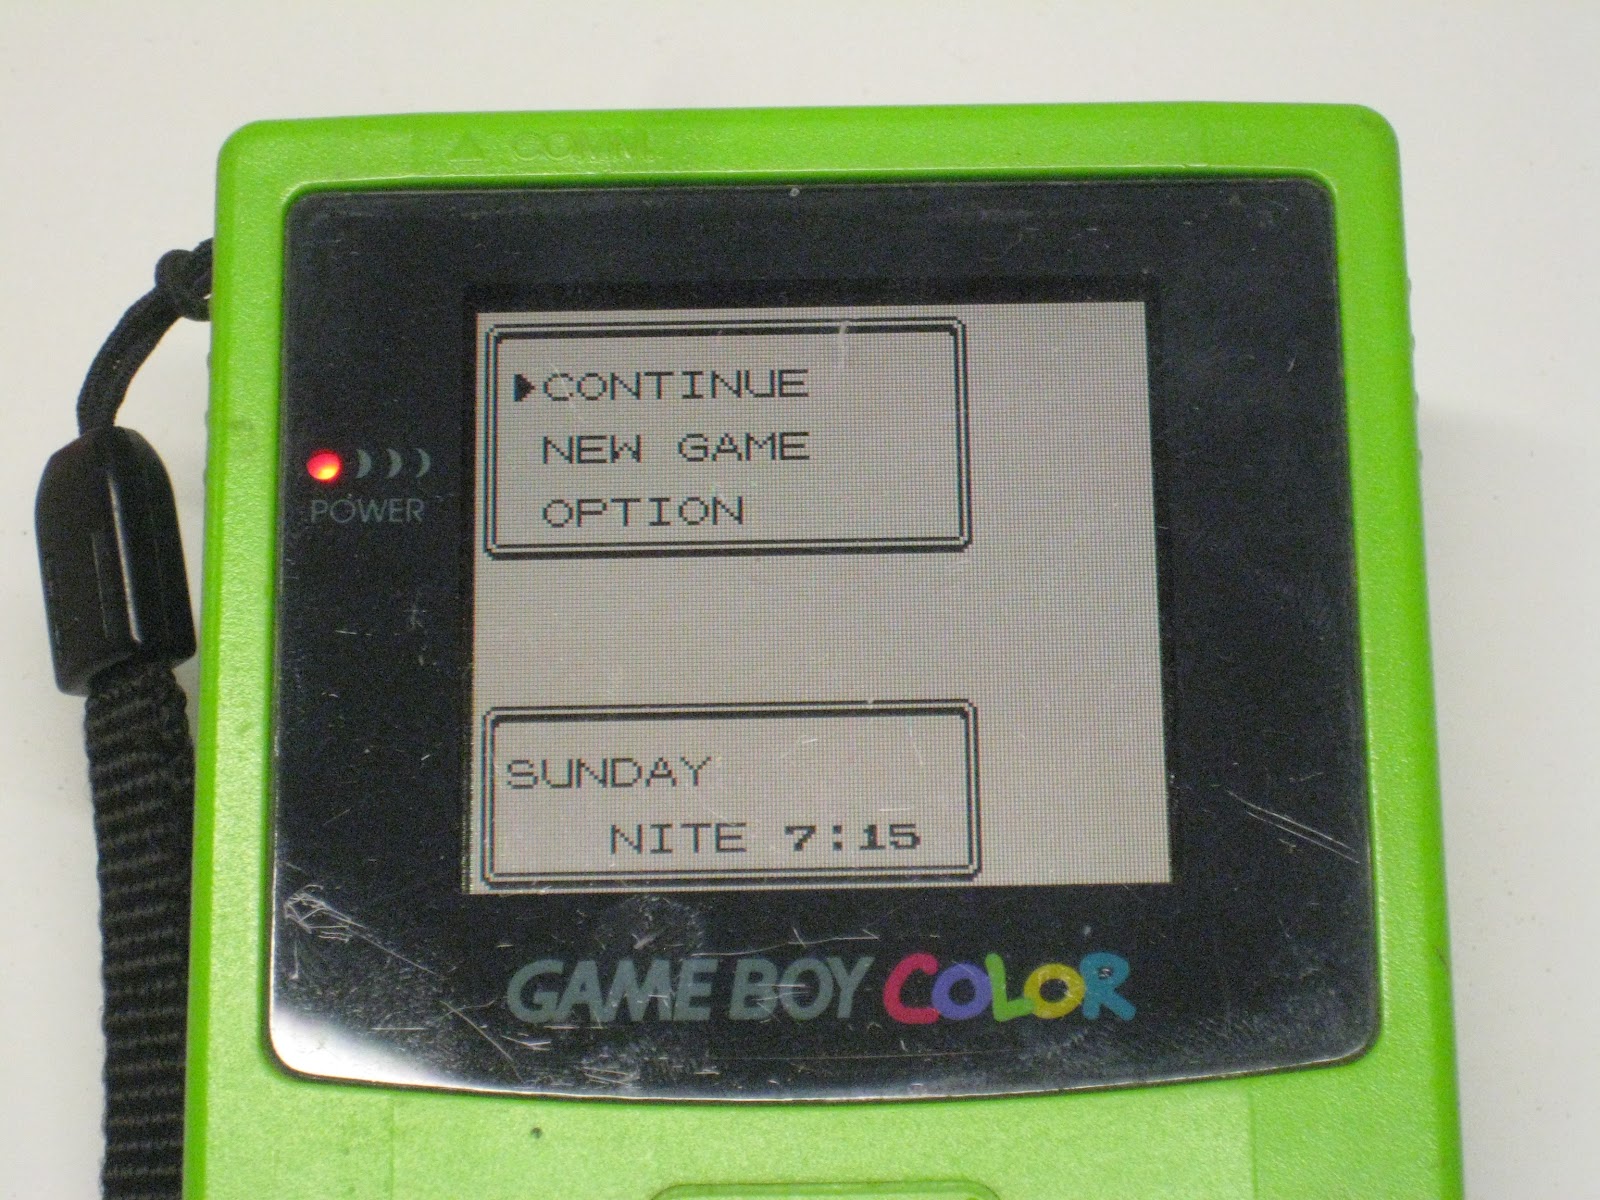
I reassembled it and started a new game and saved before setting the date (that's why the time was right but it says Sunday instead of Tuesday) and turned the console off, waited for a little while and tried to see if I could load the game. It was a great triumph for the first step towards the championship!(again) Thanks to my roommate who saved me a lot of trouble by owning a soldering iron-wannabeXD I just played it again few moments ago, so it's been working for at least a day, and hopefully for many years to come^^... And guess what? I received "save corrupted" message after 23 hours of gameplay, man was I pissed off that day>.<

Okay, part 2/2: The basic problem stated in the previous text still applied, the connection to the battery was lost for a microsecond or something stupid like that, which caused it to corrupt the save. I had to find a battery with the soldering parts already attached. I also went for the CR2032-battery because it has more mAh (milliampere-hours), and will work longer, and the thickness didn't cause too much trouble in the end. I finally found a Finnish shop which would send me the battery with the soldering tabs already attached, even though they were slightly off. They weren't too expensive either 2,12€ but the mailing fee was insane 6 €... I found really good replacement from the ebay but I didn't want to risk them not working so I swallowed my pride and got the battery from the dealer I knew would give me a refund if the product would've been in horrible condition. The batteries, since I bought one extra, were seperately and really carefully packed into tiny cardboard boxes.


The soldering tabs were meant for the battery to be soldered upright from three points of contact, so it needed some minor work to fit my needs, as seen on the picture. I soldered a copper wire to the plus-tab, cut the unnecessary plus-tab away so it wouldn't cause any problems and secured the wire to the battery with some electrical tape. I then used a little led to ensure that the power was flowing through the soldered connection and then soldered the battery in place. It was somewhat a tight fit but the game saves again! In the end this thing was quite timeconsuming as a whole and this time I hope I don't have to do any maintenance for my Gold for a long time!

"I wanna be the very best..."

Sunday, November 27, 2011

Random fun with modelling clay: PuPu from Final Fantasy VIII

PuPu the cute alien.

Final Fantasy VIII... What's there not to like? I honestly can't answer that because I'm somewhat a FF8-fanboy, hehe^^'  Okay, so I haven't finished the game yet because I like taking my sweet time doing random and mostly pointless stuff, but that's beside the point. I just managed to finish the alien-sidequest day before yesterday and decided that I have to return to my fresh patch of modelling clay and try to make myself a cute PuPu^^

Having trouble to get a good picture of the little guy XD

He/she turned out really awesome!^^ you might not see it but I made the eyes into swirls like in the game. There were some issues getting the body balanced, my fingers are normal-sized but that's still sort of clumsy when working with something so small, that explains why it was so difficult to make him/her stay upright.

Elixir please! 
I might've ended up making little PuPu a bit overweighted but those elixirs are rich with flavour and energy, right?^^ (Does anyone know if elixir contains any alcohol by the way? XD) He/she's a bit under 7 cm or little bit over 2 1/2 inches in height.

Guiding a spaceship down?
Okay, with this overly cute update, see ya next time, kupo!


Thursday, November 24, 2011

Random fun with modelling clay: Vocaloid Hatsune Miku


Popipo (Vegetable Juice) by Miku Hatsune

I hadn't played with modelling clay in such a long time that I just felt compelled to buy some when I saw some in the crafting store I was browsing for the Halloween-themed Housewarming party I held with my roommate. The party was great but I ended up misplacing the clays before the party so I never managed to make anything out of them then^^' But yesterday I finally sort of found them (I moved a box and saw what an idiot I had been for not noticing sooner), right where I had left them... After that I instantly had to start making something, but I didn't have a clue of what I should make. My roommate came to my rescue with her idea of making Miku from the song Popipo... Insane ideas are the best sometimes so I started molding different clays^^ (originally I had planned on making something simple, like a Pokémon or something, but this was just as fun) There's not much to tell about the making-of-progress as most people can make something resembling something else out of clay, like I did! I didn't even attempt on making it big or well detailed, and I was finished in 30 mins or so. Most of the time was spent on wiping my hands clean of the previous coloured clay. You wouldn't want your white clay turning into a gray one just because you just handled black clay, do you?

Right after finishing.

 Found a nice place for it in my bookshelf.

It was really difficult to get a good close-up.

And it should be noted, Miku stands 7cm or almost 3 inches from the ground/shelf XD I'm thinking of making more tiny little thingies in the future^^

Tuesday, November 15, 2011

The Sims Medieval - Doomstaff (unfinished)

November 15th

Okay, back at last^^' I've had a little break from building and/or updating my blog, sorry about that. My girlfriend and I broke up a month or so ago, but past is past. The more important thing is the project I started for her, and still haven't finished, as I'll still need to aqcuire some materials and a better plan to make it look good. I had thought about not making any unfinished prop-updates, but I probably wouldn't write too much on one sitting anyway, so I shall just update one post, and make the progress and updates visible with that date-marking I shall start using in the beginning of updates. I think it'll be less confusing to just make one long post than to make multiple about the same project, right?^^

Okay, back to the subject at hand. My project this time is quite an ambitious one because of it's size and odd detailing in my opinion as I haven't made anything like it before. It's the Doomstaff from the stand alone Sims-game The Sims Medieval, basically a big scythe the Grim Reaper from the game uses. It's also a forgeable item for the Wizard -Hero Sim.

The Grim Reaper appears.

It's pretty obvious why I wanted to try and make this weapon, the sheer shape of the blades was enough to send chills down my spine, in a good way.

Grim next to a Spy -Hero Sim overseeing someone's death.
I began this project in the summer, and I've been working on it slowly, few minutes every now and then. Believe me when I say that most of my working time has been spent on just staring the pieces and the plans, I want this to be perfect, I just hope it won't become a disappointment when I finally assemble it.

 A Wizard meditating with the Doomstaff.

This is the main picture I used when starting to design the two blades. I measured the basic proportions between Sims and the Doomstaff from various pictures to get a somewhat accurate idea of the size of the weapon. I ended up scaling the picture so that it would do two things: One, fit on paper and two, be easy to enlarge. I used a picture 1/3 of the full size for the blade. I then used a simple method for the blueprint: the "magnify the picture and draw it on the paper through the computer-screen"-method. (copyright pending, haha XD) The printer I had at the time decided to die so I had to improvise^^' I'm quite disappointed that something mysterious has happened to the blueprints so I can't show you the work it took, but I'll try explaining it in detail.

What I had to work with...

This'll need some explaining. I tried to save this piece of plywood as I had measured it would just barely be enough for the blades, as I wanted to make it unipieced so it wouldn't break down as easily. And then my dad was coating a door with tar and guess what he used  to stand on? Okay, I admit it worked and the tar didn't ruin the new concrete floor we had just finished but still, why use this piece of plywood?-.-' Just goes to show how little I'm given respect... But anyway, it didn't ruin the blade, as the ply didn't break or crack and tar only helps to keep the moisture out so I decided it wouldn't be that big of a problem^^' The lines you can see are how I copied a scaled down version of the blade into full scale. I used straight lines from points where the blade hit the edge of the plywood and right angles from premeasured spots. I'm still quite amazed about how well it worked out after I connected the points and lines. I only had to make one or two minor corrections drawing freehanded to the measurements, just to make the lines smoother to the eye. I transported the board before any sawing to the apartment, just to keep it safe and also because I was worried something might happen to it if I saw it and then tried transporting it on a bus...

Rough form.

I bought a hand-figure-saw to cut the shape, it was quite tiring and I ended up destroying at least half a dozen saw-blades. Lucky they aren't all that expensive^^ And as you might think, the extra plywood cut out didn't go to waste, heavens no, I wouldn't dream on throwing good pieces away^^ And as it turns out, I used some of the wood in The Great Gun King. Golden rule, don't throw something away if it could be reused in anything, no matter if you might not know what that something is yet, ok? Ok, moving on. The blade is 123cm for the longest distance and 47 cm for the two abeam tips from the center. I can always provide exact measurements when asked, but for now I can't bother on measuring every single curve^^' I intend on doing exact blueprints out of the blade-part for future preferences, so until then, let's move on, shall we?

The main staff-part and the blade together.

The main staff-part as I call it isn't anywhere ideal, but I got the go-ahead from the client, so I'll try working with this. It's really difficult to find the shape needed growing naturally in the woods so I had to work with the one I thought was closest possible. I'm afraid that it has taken up some moisture and became crooked, but it's not the end of the world, or so I'm being constantly told^^' It measures 190cm and is still quite heavy, which is a given considering on how bulky it has to look. I managed to make a cut to the end of the staff for the blade to fit through, too bad I had to risk it being destroyed and use a chainsaw, but it worked out fine. Don't try that at home, buy or borrow good quality equipment you're comfortable in using and which suits the your needs. But as I've said often already, I have to make do with what I can get^^'

After the two holes.

Again, try using proper tools, not a knife to drill holes, you might cut yourself, as I've done on many occasions, I'm lucky to have all my fingers intact. And yes, nearly 99% of my projects make me bleed one way or the other, this made me bleed from a splinter when I was scouting for usable plywood-piece. But about the blade itself now, I personally like the holes quite a lot, they make the blade appear like it would only have one big hole in it with a blood vessel going through it, and in my opinion it gives it a nice Grim Reaper-ish touch, intentional or not.

After some sanding.

You might notice that the blade has suffered some moisture/drying-crookedness between the two last pictures. I usually tend to keep the material in the same enviroment through the entire working-progress to preserve the moisture-conditions in order to avoid things like this. I'm still quite puzzled as to what happened, it's not like I took it into the rain every now and then... Anyway, I believe it can be fixed or at least hidden so that it wouldn't show that much, we'll just have to wait for the paint^^

 Close-up on the bending.

 It's not much, but it annoys me all the same...

Biggest flaw.

But this is the thing that annoys me the most, although it could be fixed, I was assured again that it would be better this way, as the Doomstaff should have the ragged feel of the medieval times, and that's easier with minor flaws in the shape. So for now I'm not fixing this. It was caused by the use of knife, I didn't want to sand the blade into shape from scratch, and I didn't have a file at the moment. Plywood is kinda tricky to work with because of the different layers but I'm glad only this one crack happened. You can now also see how the edge is "sharp" after the sanding.

 The holes after sanding.

 I took this picture to show you how the tar-damage isn't all that serious as I had you assume, and to point out the amount of sanding done to the two holes. I didn't sharpen them nearly as much as the outer edges as I see no need for that. I just worked a lot on the details, most of the work is such which no one even sees, But I know it's there^^

That wraps it up for now, more on the progress when I get it done, there's more than half of this project to go, but no matter, I'll look forward to it^^

Friday, September 2, 2011

The Great Gun King - Disgaea 3: Absence of Justice

My girlfriend's latest cosplay is Salvatore the Magnificent from Disgaea 3: Absence of Justice by Nippon Ichi Software and she ordered Salvatore's weapon from the special move The Great Gun King, which is a giant golden gun as name suggests with wings.^^' Salvatore summons it into battle and rides the bullet fired from it straight towards the enemies. The bullet then rams into them, sending them flying. Luckily my girlfriend wanted a handheld version so I didn't have to start planning a surfable projectile.^^ You can read more about her cosplays and other stuff on her two blogs: Miss Mii and Rosy Predictions. Miss Mii is a 4H-youth company she founded and the site is where she shows off her crafts and sells them, if you're interested in cute and original clothing, this place is worth checking out! Rosy Predictions is her personal blog where she ponders about the wacky ways of the world^^

 Salvatore just about to jump onto the summoned gun and fire.
I used a toyrevolver found in the BR-toystore as a base as it had the best fitting looks and it wouldn't break that easily. I usually do prefer wood and metal over plastic, and this gun being metal was just what the doctor ordered^^

Marshal-revolver from a BR-toystore in Tampere
 
First thing I did was dismantle the crip as it wasn't what I wanted, I still have the parts though, migh need them in a future project^^ Next I used a metal saw and cut the trigger-guard from the front and used a file to shape it into the wing that points forward. I saw no need to remove the guard and do a wing from wood, as the shape came out pretty nice and it wouldn't break or chip off like wood could. I then cut off some pieces off some extra plywood, which I had (always save extra pieces!) from my still ongoing project, into the new crip-pieces.

Speaking about stuff not breaking, second day of the build (yes, I was in no hurry) I find the main gun-piece on the floor, it had fallen from the piece-box, probably one of our cats had bumbed into it, causing it to fall, breaking the hammer. It wasn't a huge loss, I suspect it might've snapped anyway at some point, which would've forced me to file and repaint it.

After a little bit of trouble with fitting the tight pieces and glueing I continued to sanding the crip into a more tolerable shape. I also filed the front sight in half and started working on the main-wings.

The wings were my biggest concern, because in order to achieve a firm and lasting result the wings had to be made out of one single piece. I also couldn't drill any holes into the main body as I don't own a drill, yet^^' Thus the wings had to be able to stay in place with glue alone. I did add a spare nail into the wing with the intention to use some wire to pull the front tip of the wings tightly against the main body, keeping it steady, this was the only added method of keeping the wings in place, apart from the glue. Therefore a lot of weight landed on making the gap tight enough to hold the wing in place even without the glue but loose enough so that the stress wouldn't break the wings in half. The final wings in the picture to the right were in fact the fifth wings I had to make, because the previous four were not good enough. (good thing to have a lot of saved extra pieces of plywood, right?) I then sanded/sharpened the wings so they would look good and rough-sanded the main body so that glue and paint would stick and then the final assembly started.

  The painting was tricky, the brown paint I bought from the crafts-shop Tiimari was perfect and easy to work with as it could be mixed with a little bit of water to make thinner layers. But the gold-paint from the same shop was horrible, it was a spray-can-gold for Christmas-decorations. Few layers and drying later the gold-finish would just peel of with touch into powder, making the gun look like it was brass-coloured instead of gold. Luckily I remembered that model-paint left a very nice finish with the metallic paints. I went and bought gold number 94, the most basic of gold out there. After the first layer I couldn't help but to feel like a fool for even trying anything else, because the price for the gold paints doesn't show in the quality. Spray-can cost 4.50€ while the modeling-paint was 1.95€... And they both last pretty much as long, as you don't have to worry about wasting the model-paint if you can hold your brush, but with the spray-can, you're most likely going to miss your target anyway and have the furniture-protecting paper all nice and golden. Oh yes, the spray-paint seems to be perfect for paper, as the newspapers I used didn't lose the paint like the actual gun did~.~'

All and all, this was a nice project, my girlfriend was very pleased with this, which is the main thing, though I'm such a perfectionist that if the work is not as good as I can achieve with my skill (or lack of it) I'm not even going to bother handing it over to the client and asking for compensation.

Well that's about it really, it took me around a week and a half to make it, and I don't think my girlfriend's magnificent outfit is going to lose in competitions because of the prop^^